[CI/CD] 使用 App Store Connect API Webhook 串接自動化工作流程
TL;DR
本文介紹如何使用 App Store Connect API Webhook 自動化 CI/CD 工作流程,包括設定方法、驗證機制及五個實際應用案例,提升開發效率。
Key Takeaways
- •App Store Connect Webhook 能即時推送事件通知,取代傳統輪詢,節省 CI/CD 等待時間與成本。
- •五個應用案例:建置完成後自動送審、GitFlow 對齊發布時機、App 發布通知、建置失敗/審核拒絕通知、TestFlight 回饋通知。
- •設定 Webhook 需 Admin 權限,並可透過密鑰驗證請求來源,確保安全性。
- •Webhook 僅提供事件類型,需再呼叫 API 取得完整資訊(如版本號、錯誤原因)。
- •可透過 Fastlane 或自建服務串接 Webhook,實現自動化工作流程。
App Store Connect Webhook 應用案例分析與實際串接使用教學。
https://medium.com/media/488577f1a34898594b6da98d4e710915/href
前言
蘋果近年持續擴充 App Store Connect API,對開發者是一大福音。早期連憑證管理都得靠「Hardcore」的 Web Session(有期限、還要收簡訊驗證碼),很難整合進 CI/CD;像商城評價也只能依賴不穩定的 RSS。
這幾年幾乎每年都有新功能補齊,從開發、測試到部署流程,甚至後期的評價、財務、數據報表都逐步原生支援,另外也強化了使用者管理、群組、TestFlight 等能力;讓 App Store Connect API 可以更好的提升 Apple 開發者開發體驗。
延伸閱讀:「App Store Connect API 現已支援 讀取和管理 Customer Reviews」
WWDC 2025 Automate your development process with the App Store Connect API
Automate your development process with the App Store Connect API - WWDC25 - Videos - Apple Developer
2025 WWDC 更帶來引頸期盼的重磅功能 — Webhook 通知:
- 建置版本上傳狀態 (The status of a build upload changes.)
當建置版本上傳狀態更改時收到相關資料。
Complete / Failed / Processing - App 版本狀態 (The status of an app version changes.)
當 App 版本狀態更改時收到相關資料。
Prepare for Submission / Ready for Review / Waiting for Review / Ready for Distribution / Rejected… - TestFlight 版本狀態 (New TestFlight feedback is submitted by a tester.)
當測試人員留下回饋(當機回饋/截圖回饋)時收到相關資料。 - Apple-hosted 的資源包狀態改變 (The status of an Apple-hosted asset pack version changes.)
當 Apple 託管的素材包版本出現特定變更時收到相關資料。
App Store Connect API / Webhook notifications:
Webhooks enable a system to send real-time data to another system over the web.
Webhook 讓一個系統能夠透過網路即時將資料傳送給另一個系統。
Unlike traditional APIs, where one system must make a request when receiving data, a webhook enables you to push data to the receiving system as soon as an event occurs.
與傳統 API 不同的是,傳統 API 需要由接收資料的一方主動發送請求,而 Webhook 則能在事件發生的當下,立即將資料推送給接收系統。
Webhooks are event-driven, meaning they are triggered by a specific action or event and immediately send the relevant data to a predefined URL, also called the “webhook URL” or “callback URL”.
Webhook 是事件驅動的,表示它們會在特定動作或事件被觸發時,立即將相關資料傳送到一個預先設定的 URL,該 URL 也稱為「Webhook URL」或「Callback URL」。
A notification webhook is an endpoint you create on your server.
通知型 Webhook 是你在自己伺服器上建立的一個端點(endpoint)。
This webhook endpoint receives HTTP POST requests from App Store Connect.
這個 Webhook 端點會接收來自 App Store Connect 的 HTTP POST 請求。
The POST requests describe important events about your app.
這些 POST 請求會描述與你的 App 相關的重要事件。
Use the webhooks notifications endpoint to configure the notifications for events happening to your apps.
你可以使用 Webhook 通知端點,來設定當你的 App 發生各種事件時所要接收的通知。
5 個應用案例
1. 建置處理完成後觸發送審
Before:

以往在實現 App CI/CD 打包送審時,打包上傳後需要等待 Apple 處理完成才能繼續送審;Fastlane 默認的做法是 Polling App Store Connect 檢查上傳的建置狀態,直到 Complete 後才會繼續執行送審 Lane。
等待時間大約 20 分鐘,如果是 Self-hosted CI/CD 沒什麼差,但如果是使用雲端服務,這 20 分鐘的等待非常的浪費資源,以 GitHub Runner mac-OS 1 分鐘 US$ 0.062,光等待送審每次就產生無意義的花費 1.24 US$。
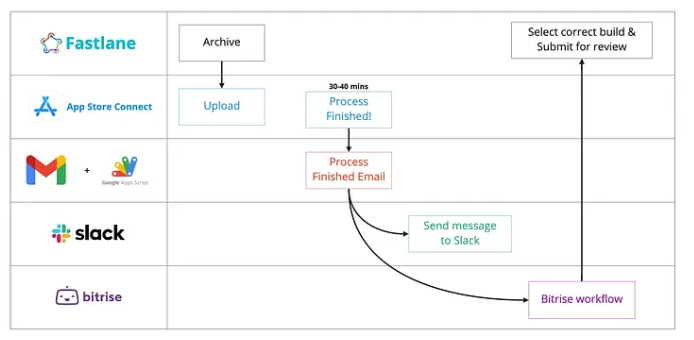
在沒有 Webhook 可以主動通知的年代,之前曾用過「Build Completed Processing 通知信搭配 Gmail Filter + Google Apps Script 來觸發」可以達到效果,但是過程有點 Hardcore。
After:
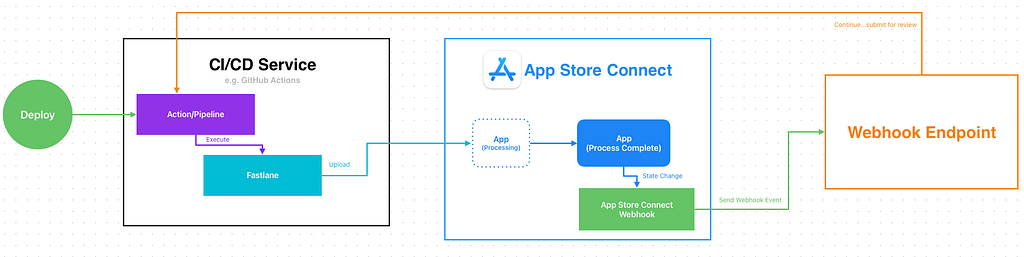
- 有了 Webhook 之後,打包上傳的步驟上傳完畢即可結束。
- App Store Connect Build Process Complete 後會發 Webhook 通知,我們收到通知後再繼續執行送審步驟。
- 零乾等成本
2. GitFlow Release 流程對齊 App Release 時機點
Before:
GitFlow 最後一步上線時需要把 develop 分支 merge 回 master 分支,master 分支對應的是當前線上版。
以往只能定時手動/自動執行,例如週一 PM 會發佈 App,週一固定把 develop 回 master;手動執行很煩、自動執行的話假設延期?週一剛好放假?實際 App 沒有 Release 但是 develop 先回 master 了。
在大多數情況不太重要,只有很極端的狀況,例如這時間中間又要插 Hotfix 就會有可能有落差;但若要追求完整穩定的 CI/CD 開發流程,這也是一個值得探討的案例。
另一條思路同上,用「App is Ready for Sale 通知信搭配 Gmail Filter + Google Apps Script 來觸發」是可行的。
After:

- 有了 Webhook 之後,可以直接在收到 App 發布通知後觸發 CI/CD Action (Master to Develop)。
- 可以確保 App 是真的上線才回 Master
3. App Release Messages
App 上線發佈給使用者後,還有另一個很常見內部工作流程,發布通知給相關團隊、版本包含的任務、Complete 相關任務。
Before:
同上,只能手動或定時自動或使用信件搭配 Gmail Filter + Google Apps Script 來觸發。
After:
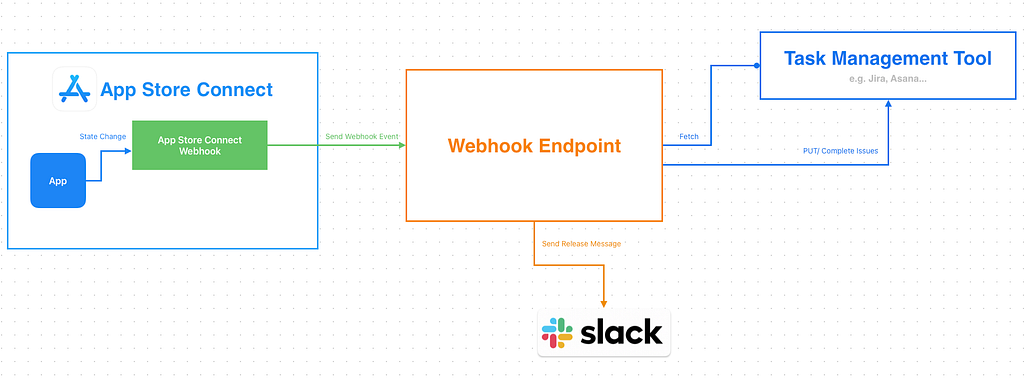
- 有了 Webhook 之後,可以在收到 App 發布通知後串接 Jira/Asana API 撈取對應版號的單批次 Complete 並且發佈包含的任務單完成釋出訊息到 Slack。
4. Build Failed / Review Rejected Notifier
前面 1,2 有提到以往有機會透過收信件通知來觸發工作流程,但在團隊規模很大權限控管嚴格的組織裡,iOS 開發者只會有「開發者」後台權限,無法釋出、管理 App,因此也無法收到任何 App 狀態改變的信件通知;其中也包含上傳的建置版本被拒或是送審被拒的通知信。
Before:
以往只能靠好心人 (a.k.a PM) 轉發信件給工程,如果好心人也沒注意到可能就真的到要上線時才發現 App 被拒絕了無法上線!
After:
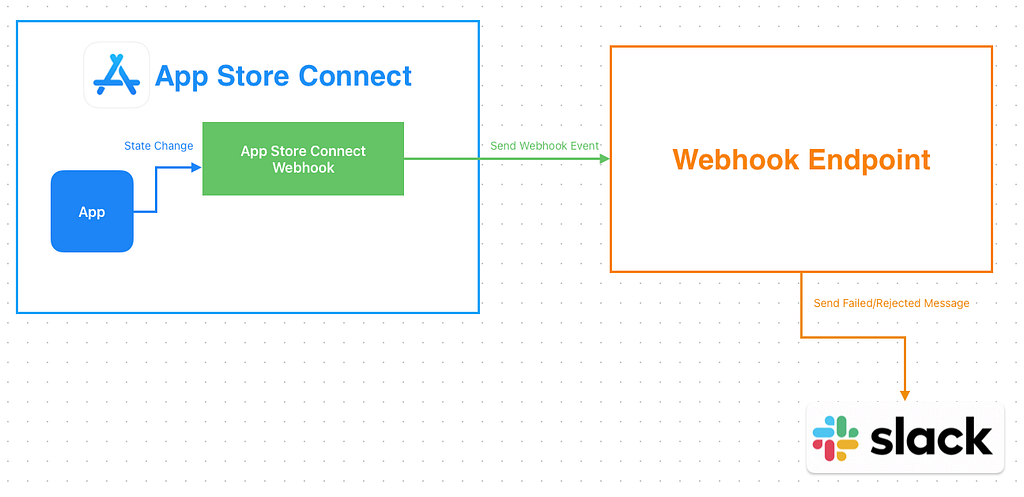
- 這個案例相對簡單,就是收到 Webhook 通知之後,轉發訊息到 Slack。
5. Testflight Feedback Notifier
類似 4. 只是改接 Testflight Feedback Webhook 通知。
Before:
以往開發者只能自己上去 App Store Connect Testflight 後台查看測試使用者的回饋或閃退問題,非常容易被忽略(甚至曾經發生過一年前回報的建議問題一年後才有人看到)。
After:
- 收到 Testflight Feedback Webhook 通知之後,轉發訊息到 Slack 。
— — —
其他應用方式歡迎大家天馬行空發想,再來將介紹如何串接使用。
App Store Connect API Webhook 設定
權限要求:需要 Admin, Account Holder 權限才能設定。
建立 App Store Connect API Webhook 通知
- 前往 App Store Connect 管理後台
- 前往「使用者與存取權限 (Users and Access)」 -> 「整合 (Integrations)」
- 點擊「其他整合 (Additional)」 下的 「Webhooks」
- 點擊「建立 Webhook」按鈕

- 名稱:輸入 Webhook 名稱
- 承載 URL(Payload URL):輸入你的 Webhook 通知接收服務網址
- 密鑰(Secret) 字串:Webhook Request 驗證密鑰(可隨機產生一個字串來用)
- App:選擇預接收 Webhook 通知的 App
- 觸發事件:
TestFlight 回饋
當測試人員留下回饋時收到相關資料。
[] 當機回饋
[] 截圖回饋

[] TestFlight 版本狀態
當 TestFlight 版本狀態更改時收到相關資料。進一步瞭解

[]App 版本狀態
當 App 版本狀態更改時收到相關資料。進一步瞭解

[]建置版本上傳狀態
當建置版本上傳狀態更改時收到相關資料。進一步瞭解

背景素材
當 Apple 託管的素材包版本出現特定變更時收到相關資料。進一步瞭解

[]更新App Store 發佈版本
[]更新外部 TestFlight 發佈版本
[]建立內部 TestFlight 發佈版本
[]更新素材包版本
依照需求勾選,也可以全選收到通知後再判斷要不要處理。
最後點擊「新增」建立 Webhook。
測試 App Store Connect API Webhook 通知
進入 Webhook 頁。
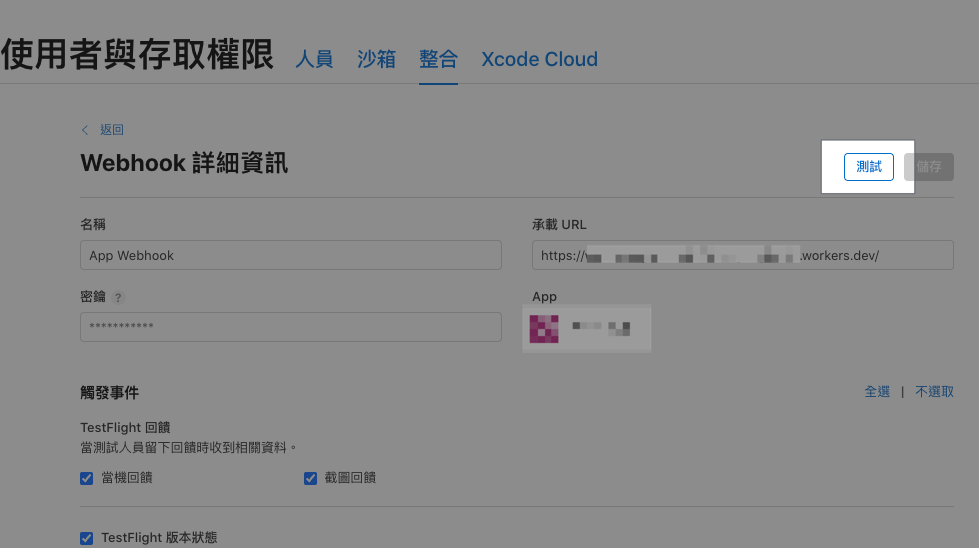
點擊右上角「測試」接收測試通知。
測試通知內容如下:
Headers:
{
  "content-type": "application/json",
  "x-apple-jingle-correlation-key": "PNSCHDQW3MY2AX6VSRFHYYNUL4",
  "x-apple-request-uuid": "7b64238e-16db-31a0-5fd5-944a7c61b45f",
  "x-apple-signature": "hmacsha256=cf50020f0bbd3c5274860594f616f1806965c1f9fb765d8d278f512dff5b4c0e",
}

Body:
{
  "data" : {
    "type" : "webhookPingCreated",
    "id" : "65726e27-cb79-47f2-a3e4-c8ced9f356e8",
    "version" : 1,
    "attributes" : {
      "timestamp" : "2025-12-26T15:47:38.472168681Z"
    }
  }
}
App Store Connect API Webhook 通知發送紀錄
Webhook 頁下方的「最近的提交項目」會顯示最近發送的 Webhook 事件。

驗證 App Store Connect API Webhook 通知
建立 Webhook 時我們有輸入一個「密鑰(Secret) 字串」建議對請求進行驗證,防止這個 Webhook URL 外洩,有心之人能隨意偽造發送 Webhook 事件到你的服務上。
驗證方式:
對 Request Body 用你設定的密鑰字串做 HMAC-SHA256 並輸出 HEX 進位字串,用這個字串比對 Request Headers 中的 x-apple-signature 值的 hmacsha256= 後面帶的字串。
實現方式 — Nodejs:
import crypto from 'crypto';

function verifyAppleWebhook(rawBody, appleSignature, secret) {
  const hex = crypto
    .createHmac('sha256', secret)
    .update(rawBody, 'utf8')
    .digest('hex');

  return `hmacsha256=${hex}` === appleSignature;
}
實現方式 — Cloudflare Worker:
function bufferToHex(buffer) {
  return [...new Uint8Array(buffer)]
    .map(b => b.toString(16).padStart(2, '0'))
    .join('');
}

async function hmacSha256Hex(secret, message) {
  const enc = new TextEncoder();

  const key = await crypto.subtle.importKey(
    'raw',
    enc.encode(secret),
    { name: 'HMAC', hash: 'SHA-256' },
    false,
    ['sign']
  );

  const signature = await crypto.subtle.sign(
    'HMAC',
    key,
    enc.encode(message)
  );

  return bufferToHex(signature);
}

async function verifyAppleWebhook(request, secret) {
  const appleSignature = request.headers.get('X-Apple-Signature');

  const rawBody = await request.clone().text();
  const calculated = await hmacSha256Hex(secret, rawBody);

  return "hmacsha256="+calculated === appleSignature;
}- Cloudflare Worker 無 crypto module,要使用 Web Crypto API(crypto.subtle)
實現方式 — Google Apps Script Web App ❌
礙於技術限制,Google Apps Script Web App doGet(e)/doPost(e) 無法從中取得 Request Headers,因此無法使用此方法對請求來源進行驗證。
最多只能自己在 URL Query 加一些密鑰參數做很簡單的判斷保護。
App Store Connect API Webhook 通知 Payload
這邊有搜集了幾個 App 上傳、送審過程會收到的事件 Payload,提供給大家做自動化開發時可以直接參考。
Webhook 只會發送事件跟狀態名稱,不會給其他詳細資訊,例如:版本號、拒審原因…等等;我們需要自己再打 App Store Connect API 帶上 Event Payload 裡的 Relationships Link 才能取得完整資訊。
建置版本上傳 — Process Complete
{
  "data" : {
    "type" : "buildUploadStateUpdated",
    "id" : "xxx-xx-xx-xx-xxx",
    "version" : 1,
    "attributes" : {
      "oldState" : "PROCESSING",
      "newState" : "COMPLETE"
    },
    "relationships" : {
      "instance" : {
        "data" : {
          "type" : "buildUploads",
          "id" : "xxx-xx-xx-xx-xxx"
        },
        "links" : {
          "self" : "https://api.appstoreconnect.apple.com/v1/buildUploads/xxx-xx-xx-xx-xxx"
        }
      }
    }
  }
}
建置版本上傳 — Process Failed
{
  "data": {
    "type": "buildUploadStateUpdated",
    "id": "xxx-xx-xx-xx-xxx",
    "version": 1,
    "attributes": {
      "oldState": "PROCESSING",
      "newState": "FAILED"
    },
    "relationships": {
      "instance": {
        "data": {
          "type": "buildUploads",
          "id": "xxx-xx-xx-xx-xxx"
        },
        "links": {
          "self": "https://api.appstoreconnect.apple.com/v1/buildUploads/xxx-xx-xx-xx-xxx"
        }
      }
    }
  }
}
多半為 Binary 遭拒,例如有用到麥克風但是沒宣告之類的。
App 版本狀態 — Prepare For Submission (準備提交)
{
  "data" : {
    "type" : "appStoreVersionAppVersionStateUpdated",
    "id" : "xxx-xx-xx-xx-xxx",
    "version" : 1,
    "attributes" : {
      "newValue" : "PREPARE_FOR_SUBMISSION",
      "oldValue" : "DEVELOPER_REJECTED",
      "timestamp" : "2025-12-18T05:01:47.118Z"
    },
    "relationships" : {
      "instance" : {
        "data" : {
          "type" : "appStoreVersions",
          "id" : "xxx-xx-xx-xx-xxx"
        },
        "links" : {
          "self" : "https://api.appstoreconnect.apple.com/v1/appStoreVersions/xxx-xx-xx-xx-xxx"
        }
      }
    }
  }
}
當新版本號建立好,準備提交送審時,這階段可填寫版本資訊、更新內容、選擇要送審的 Build。
App 版本狀態 — Ready For Review (準備送審)
{
  "data" : {
    "type" : "appStoreVersionAppVersionStateUpdated",
    "id" : "xxx-xx-xx-xx-xxx",
    "version" : 1,
    "attributes" : {
      "newValue" : "READY_FOR_REVIEW",
      "oldValue" : "PREPARE_FOR_SUBMISSION",
      "timestamp" : "2025-12-18T03:41:12.516Z"
    },
    "relationships" : {
      "instance" : {
        "data" : {
          "type" : "appStoreVersions",
          "id" : "xxx-xx-xx-xx-xxx"
        },
        "links" : {
          "self" : "https://api.appstoreconnect.apple.com/v1/appStoreVersions/xxx-xx-xx-xx-xxx"
        }
      }
    }
  }
}
送審資料確定,準備送審時。
App 版本狀態 — Waiting For Review (已送審,等待審核)
{
  "data" : {
    "type" : "appStoreVersionAppVersionStateUpdated",
    "id" : "xxx-xx-xx-xx-xxx",
    "version" : 1,
    "attributes" : {
      "newValue" : "WAITING_FOR_REVIEW",
      "oldValue" : "READY_FOR_REVIEW",
      "timestamp" : "2025-12-18T03:41:21.179Z"
    },
    "relationships" : {
      "instance" : {
        "data" : {
          "type" : "appStoreVersions",
          "id" : "xxx-xx-xx-xx-xxx"
        },
        "links" : {
          "self" : "https://api.appstoreconnect.apple.com/v1/appStoreVersions/xxx-xx-xx-xx-xxx"
        }
      }
    }
  }
}
App 已完成送審,正在等待審查。
App 版本狀態 — Developer Rejected (開發者拒絕)
{
  "data" : {
    "type" : "appStoreVersionAppVersionStateUpdated",
    "id" : "xxx-xx-xx-xx-xxx",
    "version" : 1,
    "attributes" : {
      "newValue" : "DEVELOPER_REJECTED",
      "oldValue" : "WAITING_FOR_REVIEW",
      "timestamp" : "2025-12-18T03:50:30.552Z"
    },
    "relationships" : {
      "instance" : {
        "data" : {
          "type" : "appStoreVersions",
          "id" : "xxx-xx-xx-xx-xxx"
        },
        "links" : {
          "self" : "https://api.appstoreconnect.apple.com/v1/appStoreVersions/xxx-xx-xx-xx-xxx"
        }
      }
    }
  }
}
開發者撤回正在送審的版本。
App 版本狀態 — In Review (官方正在審核)
{
  "data" : {
    "type" : "appStoreVersionAppVersionStateUpdated",
    "id" : "xxx-xx-xx-xx-xxx",
    "version" : 1,
    "attributes" : {
      "newValue" : "IN_REVIEW",
      "oldValue" : "WAITING_FOR_REVIEW",
      "timestamp" : "2025-12-18T22:05:50.038Z"
    },
    "relationships" : {
      "instance" : {
        "data" : {
          "type" : "appStoreVersions",
          "id" : "xxx-xx-xx-xx-xxx"
        },
        "links" : {
          "self" : "https://api.appstoreconnect.apple.com/v1/appStoreVersions/xxx-xx-xx-xx-xxx"
        }
      }
    }
  }
}
App 版本狀態 — Pending Developer Release (審核完畢等待發佈)
{
  "data" : {
    "type" : "appStoreVersionAppVersionStateUpdated",
    "id" : "xxx-xx-xx-xx-xxx",
    "version" : 1,
    "attributes" : {
      "newValue" : "PENDING_DEVELOPER_RELEASE",
      "oldValue" : "IN_REVIEW",
      "timestamp" : "2025-12-18T22:34:18.785Z"
    },
    "relationships" : {
      "instance" : {
        "data" : {
          "type" : "appStoreVersions",
          "id" : "xxx-xx-xx-xx-xxx"
        },
        "links" : {
          "self" : "https://api.appstoreconnect.apple.com/v1/appStoreVersions/xxx-xx-xx-xx-xxx"
        }
      }
    }
  }
}
Pending Developer Release 事件的時間 減掉 Waiting For Review 事件的時間就 等於 App 送審到可發佈狀態中間等待的時間了。
App 版本狀態 — Ready for Distribution (App 準備發佈) a.k.a Ready For Sale
{
  "data" : {
    "type" : "appStoreVersionAppVersionStateUpdated",
    "id" : "xxx-xx-xx-xx-xxx",
    "version" : 1,
    "attributes" : {
      "newValue" : "READY_FOR_DISTRIBUTION",
      "oldValue" : "PENDING_DEVELOPER_RELEASE",
      "timestamp" : "2025-12-23T06:03:50.925Z"
    },
    "relationships" : {
      "instance" : {
        "data" : {
          "type" : "appStoreVersions",
          "id" : "xxx-xx-xx-xx-xxx"
        },
        "links" : {
          "self" : "https://api.appstoreconnect.apple.com/v1/appStoreVersions/xxx-xx-xx-xx-xxx"
        }
      }
    }
  }
}
App 已準備發佈 (幾乎等同 Ready For Sale,沒有 Ready For Sale 這個事件)。
Your app has been accepted and is ready for distribution.
To distribute your app, your agreements must be in effect. The Account Holder can accept the latest agreements in the Business section.
App Store Connect API Webhook 工作流程串接
方法 1 — 借用 Fastlane 串接 App Store Connect API
這邊最快的方式是直接用 CI/CD 服務觸發,然後借用 Fastlane 自帶的 Spaceship 串接 App Store Connect API。
如果你本來 Fastlane 就有使用 App Store Connect API 管理 Match 憑證、送審,這個方法可以直接無痛使用;如果沒有要先參考官方文件產生 API Key 跟安全存放在 CI/CD 服務的密鑰中。

- App Store Connect
1. App 有狀態改變時
2. 觸發 Webhook - Webhook Endpoint
可以是 自架服務/API 或是 簡單用 FAAS 服務 (Cloudflare Worker / AWS Lambda / Cloud Functions / Google Apps Script)
3. 驗證 Webhook (optional)
4. 處理 Webhook 事件、轉發事件請求到 CI/CD 服務上執行
e.g. 透過 GitHub API 觸發 GitHub Actions.. - CI/CD Service
GitHub Actions / Bitbucket Pipeline / Gitlab Runner…
5. 觸發 Action
6. 執行 Fastlane 腳本,復用 Fastlane Spaceship 驗證 - App Store Connect
7. 打 App Store Connect API 取得完整資訊 - CI/CD Service
8. 後續步驟,例如發通知、觸發另一個 Action
Fastlane Example:
  # Usage:
  #   bundle exec fastlane appStoreConnectWebhookHandler \
  #     data:'{"data":{"type":"buildUploadStateUpdated","id":"xxx-xxx-xxx-xx-xxx","version":1,"attributes":{"oldState":"PROCESSING","newState":"COMPLETE"},"relationships":{"instance":{"data":{"type":"buildUploads","id":"xxx-xxx-xxx-xx-xxx"},"links":{"self":"https://api.appstoreconnect.apple.com/v1/buildUploads/xxx-xxx-xxx-xx-xxx"}}}}}'
  # Notes:
  # - `data:` must be a JSON string.
  # - This lane is intended for local debugging (it prints the GET response).
  desc "[Automation] Handle App Store Connect webhook payload and fetch related instance via ASC API"
  lane :appStoreConnectWebhookHandler do |options|
    begin
      data = options[:data]
      UI.user_error!("Missing data") if data.empty?
      data = JSON.parse(data)
      url = data.dig("data", "relationships", "instance", "links", "self").to_s.strip
      UI.user_error!("Missing instance self url in JSON") if url.empty?

      api_key = app_store_connect_api_key(
        key_id: "xxxx",
        issuer_id: "xxxx-xxxx-xxxx-xxxx-165aa6465141",
        key_filepath: "./AuthKey_xxxx.p8",
        duration: 1200, # optional (maximum 1200)
        in_house: false # optional but may be required if using match/sigh
      )

      loadAppStoreConnectAPIKey
      #
      uri = URI.parse(url)
      http = Net::HTTP.new(uri.host, uri.port)
      http.use_ssl = true
      http.verify_mode = OpenSSL::SSL::VERIFY_PEER
      store = OpenSSL::X509::Store.new
      store.set_default_paths
      http.cert_store = store

      request = Net::HTTP::Get.new(uri.request_uri)
      token = Spaceship::ConnectAPI.token
      UI.user_error!("App Store Connect API token is not available. Make sure app_store_connect_api_key is configured correctly.") if token.nil?
      request['Authorization'] = "Bearer #{token.text}"

      request['Content-Type'] = 'application/json'
      request['Accept'] = 'application/json'

      response = http.request(request)
      UI.message("📡 GET #{url} Response: [#{response.code}] #{response.message}")
      UI.message(response.body)
      #

      response
      ## handle response...do next actions...

    rescue => e
        UI.error("❌ Failed handle App Store Connect API Webhook: #{e}")
    end

  end
方法 2— 在 Webhook Endpoint 自行處理
第二個方法就是直接在 Webhook Endpoint 服務上處理完所有事情,但缺點是需要把 App Store Connect API Key 放到服務上跟要自己做 Token 驗證。

Ruby Example:
require 'jwt'
require 'net/http'
require 'time'

keyFile = File.read('./AuthKey_XXXX.p8') # replace to your .p8 private key file (donwload from app stroe connect)
privateKey = OpenSSL::PKey::EC.new(keyFile)

payload = {
            iss: 'YOUR_ISSUE_ID', # replace to your issue id (get in app store connect user access->key->app store connect api page)
            iat: Time.now.to_i,
            exp: Time.now.to_i + 60*20,
            aud: 'appstoreconnect-v1'
          }

token = JWT.encode payload, privateKey, 'ES256', header_fields={kid:"YOUR_KEY_ID", typ:"JWT"} # replace to your key id (get in app store connect user access->key->app store connect api page)
puts token

decoded_token = JWT.decode token, privateKey, true, { algorithm: 'ES256' }
puts decoded_token

# 替換成 Webhook Payload 中的 relationships link
uri = URI("https://api.appstoreconnect.apple.com/v1/apps/APPID/customerReviews") # repleace APPID to your app id in app store connect -> your app -> app information -> apple id
https = Net::HTTP.new(uri.host, uri.port)
https.use_ssl = true

request = Net::HTTP::Get.new(uri)
request['Authorization'] = "Bearer #{token}";

response = https.request(request)
puts response.read_body
App Store Connect API Key 產生方式、Token 產生方式、API 使用請參考「App Store Connect API 現已支援 讀取和管理 Customer Reviews」。
App Store Connect API Response
這裡附上一些收到 Webhook Event 後再打 Relationships Link 取得完整資訊的一些 Response 範例。
建置版本上傳 — Process Complete
https://api.appstoreconnect.apple.com/v1/buildUploads/xxx-xx-xx-xx-xxx
{
  "data": {
    "type": "buildUploads",
    "id": "xx-xx-xx-xxx-xx",
    "attributes": {
      "cfBundleShortVersionString": "1.101.0",
      "cfBundleVersion": "1",
      "createdDate": "2025-12-25T08:26:43-08:00",
      "state": {
        "errors": [],
        "warnings": [],
        "infos": [],
        "state": "COMPLETE"
      },
      "platform": "IOS",
      "uploadedDate": "2025-12-25T08:28:35-08:00"
    },
    "relationships": {
      "buildUploadFiles": {
        "links": {
          "self": "https://api.appstoreconnect.apple.com/v1/buildUploads/xx-xx-xx-xxx-xx/relationships/buildUploadFiles",
          "related": "https://api.appstoreconnect.apple.com/v1/buildUploads/xx-xx-xx-xxx-xx/buildUploadFiles"
        }
      }
    },
    "links": {
      "self": "https://api.appstoreconnect.apple.com/v1/buildUploads/xx-xx-xx-xxx-xx"
    }
  },
  "links": {
    "self": "https://api.appstoreconnect.apple.com/v1/buildUploads/xx-xx-xx-xxx-xx"
  }
}
建置版本上傳 — Process Failed
https://api.appstoreconnect.apple.com/v1/buildUploads/xxx-xx-xx-xx-xxx
{
  "data": {
    "type": "buildUploads",
    "id": "xx-xx-xx-xx-xxx",
    "attributes": {
      "cfBundleShortVersionString": "1.101.0",
      "cfBundleVersion": "3",
      "createdDate": "2025-12-12T09:03:32-08:00",
      "state": {
        "errors": [
          {
            "code": "90683",
            "description": "Missing purpose string in Info.plist. Your app’s code references one or more APIs that access sensitive user data, or the app has one or more entitlements that permit such access. The Info.plist file for the “My.app” bundle should contain a NSMicrophoneUsageDescription key with a user-facing purpose string explaining clearly and completely why your app needs the data. If you’re using external libraries or SDKs, they may reference APIs that require a purpose string. While your app might not use these APIs, a purpose string is still required. For details, visit: https://developer.apple.com/documentation/uikit/protecting_the_user_s_privacy/requesting_access_to_protected_resources."
          }
        ],
        "warnings": [],
        "infos": [],
        "state": "FAILED"
      },
      "platform": "IOS",
      "uploadedDate": "2025-12-12T09:05:26-08:00"
    },
    "relationships": {
      "buildUploadFiles": {
        "links": {
          "self": "https://api.appstoreconnect.apple.com/v1/buildUploads/xx-xx-xx-xx-xxx/relationships/buildUploadFiles",
          "related": "https://api.appstoreconnect.apple.com/v1/buildUploads/xx-xx-xx-xx-xxx/buildUploadFiles"
        }
      }
    },
    "links": {
      "self": "https://api.appstoreconnect.apple.com/v1/buildUploads/xx-xx-xx-xx-xxx"
    }
  },
  "links": {
    "self": "https://api.appstoreconnect.apple.com/v1/buildUploads/xx-xx-xx-xx-xxx"
  }
}
ITMS-90683 為例。
App 版本狀態
https://api.appstoreconnect.apple.com/v1/appStoreVersions/xxx-xx-xx-xx-xxx
{
  "data": {
    "type": "appStoreVersions",
    "id": "xxx-xxx-xxx-xxx",
    "attributes": {
      "platform": "IOS",
      "versionString": "1.101.0",
      "appStoreState": "READY_FOR_SALE",
      "appVersionState": "READY_FOR_DISTRIBUTION",
      "copyright": "© 2025 ZhgChgLi.",
      "reviewType": "APP_STORE",
      "releaseType": "MANUAL",
      "earliestReleaseDate": null,
      "usesIdfa": null,
      "downloadable": true,
      "createdDate": "2025-12-15T19:12:55-08:00"
    },
    "relationships": {
      "ageRatingDeclaration": {
        "links": {
          "self": "https://api.appstoreconnect.apple.com/v1/appStoreVersions/xxx-xxx-xxx-xxx/relationships/ageRatingDeclaration",
          "related": "https://api.appstoreconnect.apple.com/v1/appStoreVersions/xxx-xxx-xxx-xxx/ageRatingDeclaration"
        }
      },
      "appStoreVersionLocalizations": {
        "links": {
          "self": "https://api.appstoreconnect.apple.com/v1/appStoreVersions/xxx-xxx-xxx-xxx/relationships/appStoreVersionLocalizations",
          "related": "https://api.appstoreconnect.apple.com/v1/appStoreVersions/xxx-xxx-xxx-xxx/appStoreVersionLocalizations"
        }
      },
      "build": {
        "links": {
          "self": "https://api.appstoreconnect.apple.com/v1/appStoreVersions/xxx-xxx-xxx-xxx/relationships/build",
          "related": "https://api.appstoreconnect.apple.com/v1/appStoreVersions/xxx-xxx-xxx-xxx/build"
        }
      },
      "appStoreVersionPhasedRelease": {
        "links": {
          "self": "https://api.appstoreconnect.apple.com/v1/appStoreVersions/xxx-xxx-xxx-xxx/relationships/appStoreVersionPhasedRelease",
          "related": "https://api.appstoreconnect.apple.com/v1/appStoreVersions/xxx-xxx-xxx-xxx/appStoreVersionPhasedRelease"
        }
      },
      "gameCenterAppVersion": {
        "links": {
          "self": "https://api.appstoreconnect.apple.com/v1/appStoreVersions/xxx-xxx-xxx-xxx/relationships/gameCenterAppVersion",
          "related": "https://api.appstoreconnect.apple.com/v1/appStoreVersions/xxx-xxx-xxx-xxx/gameCenterAppVersion"
        }
      },
      "routingAppCoverage": {
        "links": {
          "self": "https://api.appstoreconnect.apple.com/v1/appStoreVersions/xxx-xxx-xxx-xxx/relationships/routingAppCoverage",
          "related": "https://api.appstoreconnect.apple.com/v1/appStoreVersions/xxx-xxx-xxx-xxx/routingAppCoverage"
        }
      },
      "appStoreReviewDetail": {
        "links": {
          "self": "https://api.appstoreconnect.apple.com/v1/appStoreVersions/xxx-xxx-xxx-xxx/relationships/appStoreReviewDetail",
          "related": "https://api.appstoreconnect.apple.com/v1/appStoreVersions/xxx-xxx-xxx-xxx/appStoreReviewDetail"
        }
      },
      "appStoreVersionSubmission": {
        "links": {
          "self": "https://api.appstoreconnect.apple.com/v1/appStoreVersions/xxx-xxx-xxx-xxx/relationships/appStoreVersionSubmission",
          "related": "https://api.appstoreconnect.apple.com/v1/appStoreVersions/xxx-xxx-xxx-xxx/appStoreVersionSubmission"
        }
      },
      "appClipDefaultExperience": {
        "links": {
          "self": "https://api.appstoreconnect.apple.com/v1/appStoreVersions/xxx-xxx-xxx-xxx/relationships/appClipDefaultExperience",
          "related": "https://api.appstoreconnect.apple.com/v1/appStoreVersions/xxx-xxx-xxx-xxx/appClipDefaultExperience"
        }
      },
      "appStoreVersionExperiments": {
        "links": {
          "self": "https://api.appstoreconnect.apple.com/v1/appStoreVersions/xxx-xxx-xxx-xxx/relationships/appStoreVersionExperiments",
          "related": "https://api.appstoreconnect.apple.com/v1/appStoreVersions/xxx-xxx-xxx-xxx/appStoreVersionExperiments"
        }
      },
      "appStoreVersionExperimentsV2": {
        "links": {
          "self": "https://api.appstoreconnect.apple.com/v1/appStoreVersions/xxx-xxx-xxx-xxx/relationships/appStoreVersionExperimentsV2",
          "related": "https://api.appstoreconnect.apple.com/v1/appStoreVersions/xxx-xxx-xxx-xxx/appStoreVersionExperimentsV2"
        }
      },
      "customerReviews": {
        "links": {
          "self": "https://api.appstoreconnect.apple.com/v1/appStoreVersions/xxx-xxx-xxx-xxx/relationships/customerReviews",
          "related": "https://api.appstoreconnect.apple.com/v1/appStoreVersions/xxx-xxx-xxx-xxx/customerReviews"
        }
      },
      "alternativeDistributionPackage": {
        "links": {
          "self": "https://api.appstoreconnect.apple.com/v1/appStoreVersions/xxx-xxx-xxx-xxx/relationships/alternativeDistributionPackage",
          "related": "https://api.appstoreconnect.apple.com/v1/appStoreVersions/xxx-xxx-xxx-xxx/alternativeDistributionPackage"
        }
      }
    },
    "links": {
      "self": "https://api.appstoreconnect.apple.com/v1/appStoreVersions/xxx-xxx-xxx-xxx"
    }
  },
  "links": {
    "self": "https://api.appstoreconnect.apple.com/v1/appStoreVersions/xxx-xxx-xxx-xxx"
  }
}
如前述,詳細 App 資訊、版號、錯誤原因都要打 API 才會拿到。
Done
至此我們已經可以透過 App Store Connect API Webhook 更好地完善 App CI/CD 及自動化工作流程,提升團隊開發效率。
延伸閱讀
- CI/CD 實戰指南(一):CI/CD 是什麼?如何透過 CI/CD 打造穩定高效的開發團隊?工具選擇?
- ZReviewTender — 免費開源的 App Reviews 監控機器人
- App Store Connect API 現已支援 讀取和管理 Customer Reviews
有任何問題及指教歡迎 與我聯絡 。
https://medium.com/media/8652ffa596b15d4e2a3dc94591c00522/href[CI/CD] 使用 App Store Connect API Webhook 串接自動化工作流程 was originally published in ZRealm Dev. on Medium, where people are continuing the conversation by highlighting and responding to this story.