iOS Certificates, Identifiers & Profiles 是什麼及 Fastlane Match 統一管理憑證與 CI/CD 的一些筆記
TL;DR
本文介紹 iOS 開發中 Certificates、Identifiers 和 Profiles 的關係,並詳細說明如何使用 Fastlane Match 統一管理簽發憑證,以及如何將其整合到 CI/CD 工作流程中,解決團隊開發和自動化部署中的憑證管理問題。
Key Takeaways
- •Certificates、Identifiers 和 Profiles 是 Apple 生態系中 App 開發的基礎組件,分別代表簽發者、App 識別和組合關係,嚴格控管安裝與使用。
- •Fastlane Match 通過將憑證和描述檔加密儲存在 Git 等儲存庫中,實現團隊統一管理,避免憑證混亂和手動分發問題。
- •整合 CI/CD 時需解決私有 Match Repo 克隆、App Store Connect API Key 安全存放、Passphrase 設定及 Keychain 處理等關鍵問題。
- •使用 Fastlane Match 可自動化註冊新裝置並更新描述檔,簡化團隊協作和 CI/CD 流程。
- •透過 GitHub Actions 和 Deploy Key 等機制,可安全地在 CI/CD 環境中拉取和管理憑證,提升自動化部署的穩定性和安全性。
介紹 Certificates, Identifiers & Profiles 之間的關係與使用 Fastlane Match 統一管理簽發憑證並整合進 CI/CD 工作流程的紀錄。
https://medium.com/media/488577f1a34898594b6da98d4e710915/href
前言
2025 年中時寫過一系列從 0 到 1 使用 GitHub Actions 建置 App CI/CD 完整流程的文章:
- CI/CD 實戰指南(一):CI/CD 是什麼?如何透過 CI/CD 打造穩定高效的開發團隊?工具選擇?
- CI/CD 實戰指南(二):GitHub Actions 與 self-hosted Runner 使用與建置大全
- CI/CD 實戰指南(三):使用 GitHub Actions 實作 App 專案的 CI 與 CD 工作流程
- CI/CD 實戰指南(四):使用 Google Apps Script Web App 串接 GitHub Actions 建置免費易用的打包工具平台
最近到新環境又重新跑了一次,每次都有學習到新的東西,這次聚焦在 iOS Codesigning:Certificates / Profiles / Devices 的關係,與我如何用 Fastlane Match 把憑證管理與 CI/CD 串起來。
Certificates, Identifiers & Profiles, Devices 是什麼?
在 Apple 生態系中,App 開發是基於憑證與描述檔控管的,跟 Android 只要有 .apk 就能安裝使用不同;Apple 有嚴格的憑證對應管制,不符合規則就不能安裝、使用。
主要項目組成及功能:
Certificates: 簽署 App 的身分 (Signing Identity)
- Development — 開發階段跑在實體機上使用(只跑模擬器不用憑證),所屬是人或 API Key (有數量限制)。
- Distribution — 打包上 AppStore, TestFlight 或是 Ad Hoc 內測(限定已註冊裝置)使用,有數量限制,所屬是 Team。
- Enterprise — 企業內部 App 使用。
格式:需要有 Private Key (私鑰) 加 Certificate .cer (公鑰憑證) 才能使用,或是在原創建電腦上的 Keychain 匯出成 .p12 檔案就會同時包含。

Identifiers: 哪一個 App/Extension (Bundle ID)
App 的 Bundle ID 註冊跟需要啟用的 Capabilities(例如啟用 Push Notifications, App Groups…)、App Services。
Extension 也會有自己的 Identifier。
Devices: 已註冊裝置 (iPhone/iPad..)
Development 跑在實體機上跟 Distribution Ad Hoc 內測只有註冊的裝置才能使用。
上限:100 個;包含取消,要等到每年付費週期才會重新刷新釋出額度。
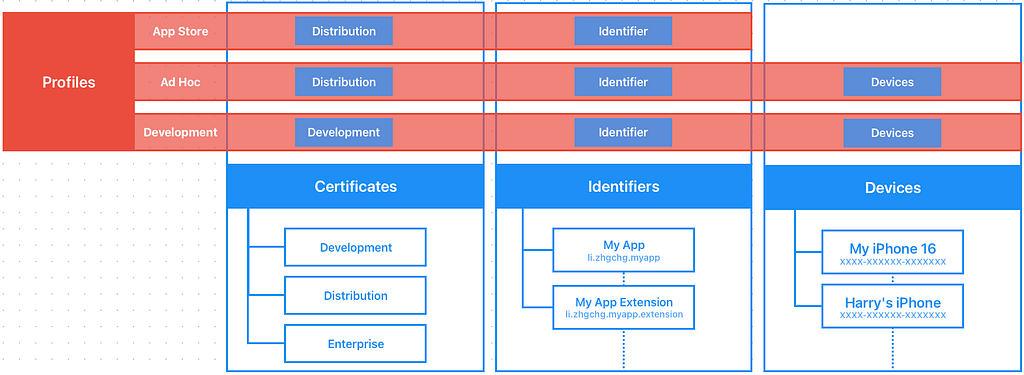
Provisioning Profile (以下簡稱 Profile): 描述檔
組合 Certificates+Identifiers+Devices 關係。
- Development — 開發階段使用的描述檔,如果要跑實體機測試就必須使用,描述檔包含 Certificates+Identifiers+Devices 之間的關係。
- Ad Hoc —打包給內部測試使用(e.g. Deploy to Firebase App Distribution)的描述檔,描述檔包含 Certificates+Identifiers+Devices 之間的關係。
- App Store— 打包上傳到 App Store / TestFlight 使用的描述檔,描述檔包含 Certificates+Identifiers 之間的關係。
格式:.mobileprovision
要注意:Profile 只是描述檔,描述關係,不會包含憑證本體。
小結
綜合以上,如果要在一台乾淨的機器、不登入 Xcode Apple Account 的情況下要能 Build 實體機 (Development Certificate) 或是執行 Archive 打包 (Distribution Certificate),必須要有兩個檔案:
- .mobileprovision Provisioning Profile 描述檔: 描述Certificates+Identifiers+Devices 關係。
- .p12 Certificate: 憑證的實體 (從原創建 Certificate 的電腦匯出)。
另外 macOS ≥ 15 後的 Keychain 移動到:
open /System/Library/CoreServices/Applications/Keychain\ Access.app
找了超久..
常見錯誤
⚠️⚠️⚠️ 確定憑證、Profile 都正確但怎麼樣都報錯:
多半是你還殘存有之前的憑證、多張憑證,Xcode 會錯亂。
這問題很常會遇到!
- 關閉 Xcode
- 打開 macOS keychain: open /System/Library/CoreServices/Applications/Keychain\ Access.app
- login keychain -> All items -> 搜尋 apple development -> 刪除所有 Certificates 憑證
- Finder -> Go -> Go to -> ~/Library/MobileDevice/Provisioning\ Profiles -> 刪除所有 Profiles 描述檔
- 重新拉取憑證
- 重開 Xcode 應該就正常了
No signing certificate “iOS Distribution” found / No signing certificate “iOS Development” found.:
No "iOS Distribution" signing certificate matching team ID "" with a private key was found.
No "iOS Development" signing certificate matching team ID "" with a private key was found.
原因:
- 缺少 iOS Distribution/iOS Development Certificate 憑證
- 有 iOS Distribution/iOS Development Certificate 憑證 但是 沒有對應的 Private Key 私鑰
解決辦法:
- 刪除 Keychain 裡的所有舊 Certificates 憑證、Profiles 描述檔
- 在當初創建 Certificate 的電腦 Keychain 上找到該憑證,匯出成 .p12 格式,在有問題電腦上安裝。
- 到 Certificates, Identifiers & Profiles Revoke 舊的 Certificate,重新產生
(放心,不影響線上版 App;只影響開發與打包階段)
Provisioning profile “” doesn’t include signing certificate “Apple Development: XXX”. / Provisioning profile “” doesn’t include signing certificate “Apple Distribution: XXX”.:
原因:
- 目前選擇的 Provisioning profile 描述檔跟當前的 Certificate 沒有對應關係
解決辦法:
- 刪除 Keychain 裡的所有舊 Certificates 憑證、Profiles 描述檔
- 到 Certificates, Identifiers & Profiles Profiles 確認描述檔有勾選對應憑證或重產 Profile 使用
No profile for team ‘’ matching ‘’ found: Xcode couldn’t find any provisioning profiles matching ‘’.:
原因:
- 找不到指定的 Provisioning profile 描述檔
解決辦法:
- 刪除 Keychain 裡的所有舊 Certificates 憑證、Profiles 描述檔
- 到 Certificates, Identifiers & Profiles Profiles 下載對應的 Profile 使用
Provisioning profile “” has app ID “”, which does not match the bundle ID “”. / Provisioning profile doesn’t match the bundle identifier:
原因:
- Provisioning profile 不包含目前的 Bundle Identifier
解決辦法:
- 刪除 Keychain 裡的所有舊 Certificates 憑證、Profiles 描述檔
- 到 Certificates, Identifiers & Profiles Identifiers 確認 Bundle Identifier 已註冊
- 到 Certificates, Identifiers & Profiles Profiles 下載對應的 Profile 使用
Provisioning profile “” doesn’t include the currently selected device “” (identifier ).:
原因:
- Provisioning profile 不包含選擇的實體機 Device Identifier
解決辦法:
- 到 Certificates, Identifiers & Profiles Devices 確認實體機的 Identifier 已註冊
- 到 Certificates, Identifiers & Profiles Profiles 對應的 Profile 該 實體機 有勾選啟用。
- 重新下載 Profile 使用
Could not create another Development/Distribution certificate, reached the maximum number of available Development/Distribution certificates. :
原因:
代表建立的 Development/Distribution Certificate 已達上限數量。
解決辦法:
- 到 Certificates, Identifiers & Profiles 刪除不使用的憑證。
Xcode 憑證正確且可以正常打包但是用 CLI (Fastlane) 執行打包命令會出現簽名錯誤:
原因:
這邊還有踩到另一個雷,就是我手賤把專案放在 iCloud 同步目錄下,不知道為何Fastlane 會一直出現憑證問題 (疑似 keychain 存取有問題)。
解決辦法:
移出 iCloud 同步目錄即可。
日常使用的問題場景
Development Certificate
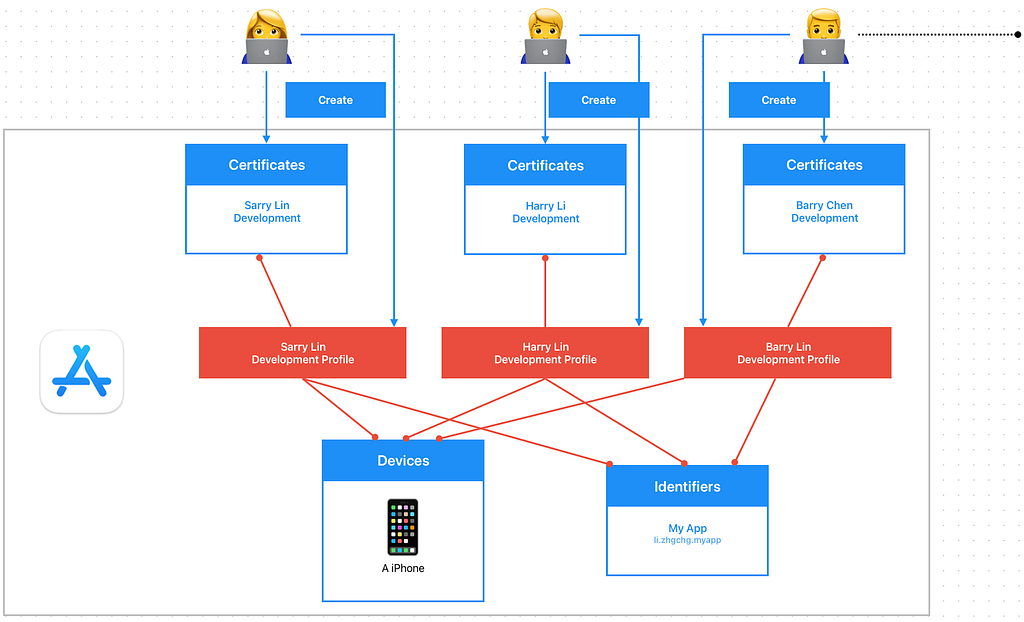
- 在導入 Match 統一管理憑證之前,每位開發者都會建立自己的 Development Certificate 和 Development Profile;假設組織內有 1,000+ 位開發者,在 Certificates, Identifiers & Profiles, Devices 後台會非常的混亂可怕。
- 如果有外包團隊,只負責開發工作,還是需要把他加入到 Apple Developer Program 後台,讓他產自己的開發憑證跟 Profile。
Distribution Certificate

- Distribution Certificate 是 by Team 建立,因此每個開發者計劃的 Team 只能建立有限數量的發行憑證。
- 常見做法是由一位工程師建立產生 Distribution Certificate 再匯出 .p12 檔案給其他需要上架的開發者或是放到 CI/CD 機器上使用。
- 團隊大、App 數量多時要寄來寄去的會很麻煩,而且每年都要更新一次
- 打包 Ad Hoc 時,當有新裝置註冊;所有人、CI/CD 都需要重新下載 Profile 才能讓新裝置生效。
Fastlane Match
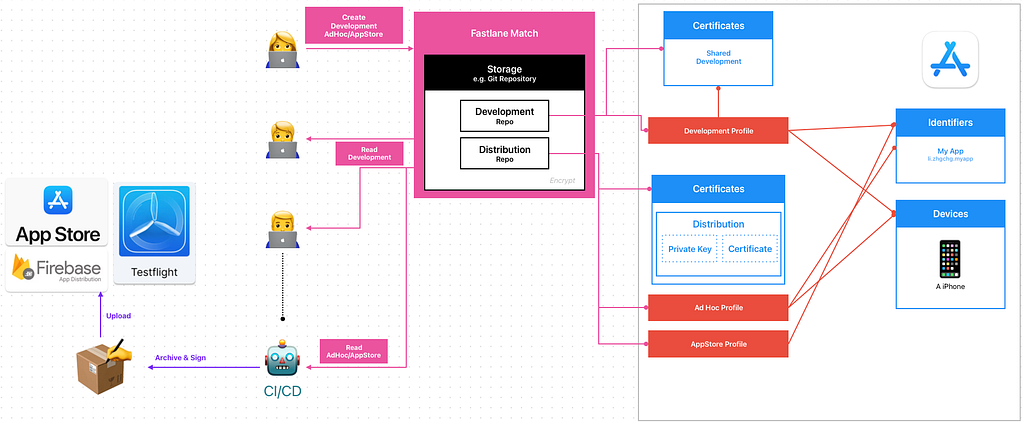
基於以上問題我們希望能有一個平台幫我們代為管理所有跟憑證有關的事物,所有開發者跟 CI/CD 服務都是統一對這個平台拉取、更新資料,這個平台的儲存必須安全,這就是 — Fastlane Match。
Easily sync your certificates and profiles across your team
A new approach to iOS and macOS code signing: Share one code signing identity across your development team to simplify your codesigning setup and prevent code signing issues.
match is the implementation of the codesigning.guide concept. match creates all required certificates & provisioning profiles and stores them in a separate git repository, Google Cloud, or Amazon S3. Every team member with access to the selected storage can use those credentials for code signing. match also automatically repairs broken and expired credentials. It’s the easiest way to share signing credentials across teams
Fastlane Match:
- 跟 App Store Connect 做交互 (透過 App Store Connect API or Apple Developer Login Session),產生或是更新憑證
- 把憑證結果 (.mobileprovision Profiles, .p12 Certificate, .cer Certificate) 三個檔案加密上傳到 Git Repo (也可以用其他 Storage)
.cer Certificate 也會獨立存,因為這樣才能知道憑證是否有效 - 如果要細分權限可以分兩個 Repos,一個管理 Development 憑證、一個管理 Distribution 憑證。
- The certs folder contains all certificates with their private keys
- The profiles folder contains all provisioning profiles

加密算法:AES-256-GCM
開發者、CI/CD 服務:
- 統一使用 Fastlane match 指令操作憑證。
- Fastlane Match 會優先拉回 Git Repo 的憑證檔案、解密回來使用,如果發現過期或是無法使用,有權限(Create/Write)的情況下會自動重新產生並 Push 回去 Repo;若只有 Read 權限則報錯。
Create/Write:
- 只有負責管理憑證的人可以產生/更新、Push 上傳憑證
- 重要的 Distribution Certificate 最好放在獨立 Repo 且只有 CI/CD 服務或管理者可以使用
Read:
- 其他開發者、CI/CD 服務都只有讀取 Pull 憑證權限
- CI/CD 服務會在每次執行任務前拉取最新憑證
- 所有人共用同一張 Development & Distribution Certificate
- 人員異動後會失去 Match Repo 權限,可以 Revoke 舊的憑證重新產生,其他人在重新 Pull 就好(如果有整合到 make project script 那更無痛)
Fastlane Match 設定與使用
我們以 Git Storage 為例,所有憑證。
1.建立一個空的儲存憑證的 Git Private Match Repo
雖然所有 Certificates, Profiles 都會加密儲存,但還是要設定好該 Repo 的存取權限。
2.確認本地有設定好 Git SSH 存取權限,可以使用 git clone [email protected]:xxx/certificates.git
這邊建議統一都使用 SSH Git Clone Repo,因為 CI/CD 也會使用相同的方式。
如果執行 fastlane match 一直卡在 If cloning the repo takes too long, you can use the `clone_branch_directly` option in match. 多半就是遇到 SSH 權限問題。
3. 在專案目錄執行 bundle exec fastlane match init 完成設定
[21:54:32]: fastlane match supports multiple storage modes, please select the one you want to use:
1. git
2. google_cloud
3. s3
4. gitlab_secure_files
# 輸入 1 用 git
?   1

[22:04:40]: Please create a new, private git repository to store the certificates and profiles there
[22:04:40]: URL of the Git Repo: [email protected]:xxx/certificates.git
# 輸入你建立的 Git Private Match Repo SSH URL

[22:04:47]: Successfully created './fastlane/Matchfile'. You can open the file using a code editor.
[22:04:47]: You can now run `fastlane match development`, `fastlane match adhoc`, `fastlane match enterprise` and `fastlane match appstore`
[22:04:47]: On the first run for each environment it will create the provisioning profiles and
[22:04:47]: certificates for you. From then on, it will automatically import the existing profiles.
[22:04:47]: For more information visit https://docs.fastlane.tools/actions/match/
4.完成後會產生一個 fastlane/Matchfile:
# 你的 Git Private Match Repo SSH URL
git_url("[email protected]:xxxx/certificates.git")

storage_mode("git")

type("development") # The default type, can be: appstore, adhoc, enterprise or development

# app_identifier(["tools.fastlane.app", "tools.fastlane.app2"])
# username("[email protected]") # Your Apple Developer Portal username

# For all available options run `fastlane match --help`
# Remove the # in the beginning of the line to enable the other options

# The docs are available on https://docs.fastlane.tools/actions/match
5. 產生 App Store Connect API .p8 Key,統一使用 API Key 產生憑證:

⚠️️️️App Store Connect API .p8 Key 的權限很大,除了可以管理憑證、也可以管理 App 的上架、送審,還有後台使用者跟評論、財務數據報表。
要不要進到團隊的 .git 讓大家都能存取,可依照團隊情境自行決定。
比較高風控的方式是只有負責管理的人跟加密儲存在 CI/CD 上使用(文後會介紹)。
這邊為了 Demo 方便直接放進 fastlane 目錄下存取。
另外本篇的 Fastlane Script 為了方便展示,不考慮重複程式碼與程式結構。
憑證管理
platform :ios do
  lane :match_development do |options|
    # 換成你的 App Identifier ID
    app_identifier = "li.zhgchg.myApp"

    type = options.fetch(:type, "development")
    isRead = options.fetch(:isRead, true)
    if isRead
      readonly = true
      force = false
    else
      readonly = false
      force = true

      # 需要 App Store Connect API Key 才有權限去 Apple 後台管理憑證
      # 假設 App Store Connect API .p8 Key 在 ./fastlane/ 目錄內
      app_store_connect_api_key(
        key_id: "XXXXXX",
        issuer_id: "XXXXXX-XXXXXX-XXXXXX-XXXXXX-XXXXXX",
        key_filepath: "./fastlane/AuthKey_XXXXXX.p8",
      )
    end

    # 拉取 app_identifier 的 Development 憑證
    match(
      type: type,
      app_identifier: app_identifier,
      readonly: readonly, # 能否從有需要時,更新、上傳 cert / profile
      force: force # 要不要無條件重建 provisioning profile
    )
  end
end
建立 Development Certificate & Profile 並上傳到 Match Repo:
bundle exec fastlane match_development type:development isRead:false
[22:22:38]: Creating new provisioning profile for 'li.zhgchg.myApp' with name 'match Development li.zhgchg.myApp' for 'ios' platform
[22:22:39]: Downloading provisioning profile...
[22:22:39]: Successfully downloaded provisioning profile...
[22:22:39]: Installing provisioning profile...
/var/folders/pk/978f3gws7ml0bkmrw245cg_c0000gn/T/d20260103-5010-v6r6w2/profiles/development/Development_li.zhgchg.myApp.mobileprovision
[22:22:39]: Installing provisioning profile...
[22:22:39]: 🔒  Successfully encrypted certificates repo
[22:22:39]: Pushing changes to remote git repo...
[22:22:42]: Finished uploading files to Git Repo [[email protected]:xxxx/certificates.git]
- 沒有錯誤就代表 Development Certificate & Profile 產生、安裝成功並同步 Push 上傳到 Match Repo 成功。
首次建立會需要你設定 Passphrase:
[23:29:12]: Enter the passphrase that should be used to encrypt/decrypt your certificates
[23:29:12]: This passphrase is specific per repository and will be stored in your local keychain
[23:29:12]: Make sure to remember the password, as you'll need it when you run match on a different machine
[23:29:12]: Passphrase for Match storage:
- 這個值就是用來加密你的所有 Match Repo 上的檔案的會需要用到的參考 (passphrase + random salt)
- 建議產生一個隨機字串設定並記錄下來
- 日後更新或是其他人拉取 Match Repo 憑證都需要輸入這個 字串 解密回原始檔案。
團隊其他成員統一從 Match Repo Pull 拉取 Development Certificate & Profile:
bundle exec fastlane match_development type:development
首次使用會詢問你的登入密碼 (login keychain),因為要把憑證安裝到 keychain 中,輸入兩次確認即可:
[16:52:59]: Installing certificate...
[16:53:00]: There are no local code signing identities found.
You can run security find-identity -v -p codesigning to get this output.
This Stack Overflow thread has more information: https://stackoverflow.com/q/35390072/774.
(Check in Keychain Access for an expired WWDR certificate: https://stackoverflow.com/a/35409835/774 has more info.)
[16:53:00]: Enter the password for /Users/zhgchgli/Library/Keychains/login.keychain-db
[16:53:00]: This passphrase will be stored in your local keychain with the name fastlane_keychain_login and used in future runs
[16:53:00]: This prompt can be avoided by specifying the 'keychain_password' option or 'MATCH_KEYCHAIN_PASSWORD' environment variable
[16:53:00]: Password for login keychain: ********
[16:53:24]: Type password for login keychain again: ********
如果 Match Development 拉完憑證,但 Xcode 一直顯示有錯誤或無效:
可參考前文提到的常見錯誤,多半是有舊的髒憑證,清除所有憑證再重新拉取,應該就可以了。
—
建立 AdHoc Distribution Certificate & Profile 並上傳到 Match Repo:
bundle exec fastlane match_development type:adhoc isRead:false
建立 AppStore Distribution Certificate & Profile 並上傳到 Match Repo:
bundle exec fastlane match_development type:appstore isRead:false
CI/CD 服務統一從 Match Repo Pull 拉取 Distribution Certificate & Profile (isRead:true),然後再執行打包發佈任務。
註冊新裝置
platform :ios do
  desc "Register a new device and refresh profiles"
  lane :registerDevice do |options|
    # 換成你的 App Identifier ID
    app_identifier = "li.zhgchg.myApp"

    # 需要 App Store Connect API Key 才有權限去 Apple 後台管理憑證
    # 假設 App Store Connect API .p8 Key 在 ./fastlane/ 目錄內
    app_store_connect_api_key(
      key_id: "XXXXXX",
      issuer_id: "XXXXXX-XXXXXX-XXXXXX-XXXXXX-XXXXXX",
      key_filepath: "./fastlane/AuthKey_XXXXXX.p8",
    )
    # Input: UDID and device name
    udid = options[:udid] || UI.input("Enter device UDID:")
    device_name = options[:name] || UI.input("Enter device name:")
    UI.message("📱 Registering device #{device_name} (#{udid})")
    register_device(
      name: device_name,
      udid: udid,
      platform: 'ios'
    )

    # 更新 app_identifier 的 Development 憑證
    match(
      type: "development",
      app_identifier: app_identifier,
      readonly: false, # 如果有需要,更新、上傳 cert / profile
      force_for_new_devices: true # 如果為新裝置則重建 provisioning profile
    )

    # 更新 app_identifier 的 AdHoc 憑證
    match(
      type: "adhoc",
      app_identifier: app_identifier,
      readonly: false, # 如果有需要,更新、上傳 cert / profile
      force_for_new_devices: true # 如果為新裝置則重建 provisioning profile
    )
  end
end
註冊完之後其他開發者或 CI/CD 服務再從 Match Repo 拉 Profile (Development or AdHoc) 就會包含新的裝置了。
Fastlane Match x CI/CD 工作流程整合
大致介紹完 Fastlane Match 怎麼產生 Push / 拉取 Pull 憑證後,再來要講怎麼整合進 CI/CD 流程。
問題1 — 怎麼 Clone Private Match Repo
第一個最常見的問題就是在 CI/CD 上怎麼 Clone Private Match Repo 專案,在本機開發上因為我們統一都使用 ssh git clone 並且是用我們自己帳號的 ssh key 所以不會遇到問題;但是 CI/CD 上沒有這個 key,當然也可以用個人的 key 但是很不保險。
GitHub — Repo Deploy Key:
1.我們先在本地產生 private/public key: ssh-keygen -t rsa -b 4096 -f ./id_rsa (不要輸入 passphrase)
2.到 Match Private Repo -> Settings -> Security -> Deploy keys -> Add deploy key:
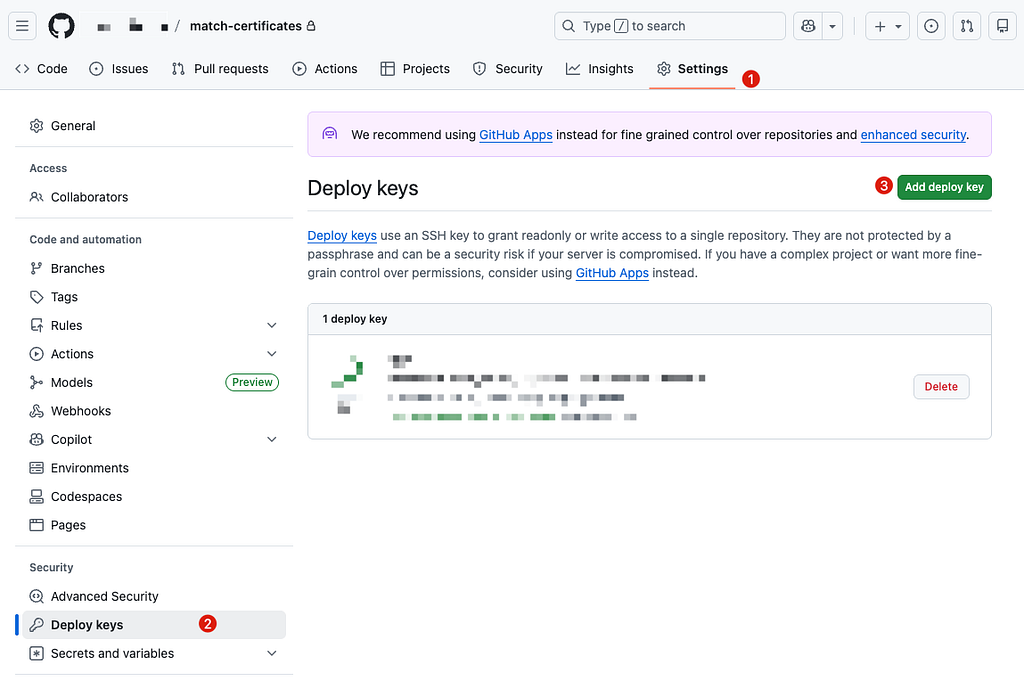
3. 用文字編輯器打開「id_rsa.pub」複製內容貼上到 Key ->「Add key」

5. 回到主要 Repo -> Settings -> Security -> Secrets and variables

5. 新增 SSH Private Key Content 到 Secret:

- Name: MATCH_REPO_DEPLOY_PRIVATE_KEY
6. 回到主要 Repo 的 GitHub Actions 設定 SSH Key:
name: CI - Deploy

on:
  push:
    branches: [ main ]
  pull_request:

jobs:
  build:
    runs-on: ubuntu-latest
    steps:
      - name: Checkout current repo (Repo A)
        uses: actions/checkout@v4

      - name: Setup SSH for Deploy Key
        run: |
          mkdir -p ~/.ssh
          echo "${{ secrets.MATCH_REPO_DEPLOY_PRIVATE_KEY }}" > ~/.ssh/id_ed25519
          chmod 600 ~/.ssh/id_ed25519
          ssh-keyscan github.com >> ~/.ssh/known_hosts

      - name: Test Clone
        run: |
          git clone [email protected]:xxxx/match-certificates.git
# Success!
# .. do deploy job...
7. 設定成功!
問題2— App Store Connect API .p8 Key 安全存放使用
因為 GitHub Actions 不能存檔案,所以只能先存成字串,然後寫入檔案。
- 同問題 1 步驟,在主要 Repo 新增一個 APP_STORE_CONNECT_API_KEY_CONTENT Secret
- 用文字編輯器打開 AuthKey_XXXXXX.p8 複製並貼上內容
- 主要 Repo 的 GitHub Actions 加上一個步驟讀出內容寫入檔案:
name: CI - Deploy
on:
  push:
    branches: [ main ]
  pull_request:
jobs:
  build:
    runs-on: ubuntu-latest
    steps:
      - name: Checkout current repo (Repo A)
        uses: actions/checkout@v4

      - name: Setup SSH for Deploy Key
        run: |
          mkdir -p ~/.ssh
          echo "${{ secrets.MATCH_REPO_DEPLOY_PRIVATE_KEY }}" > ~/.ssh/id_ed25519
          chmod 600 ~/.ssh/id_ed25519
          ssh-keyscan github.com >> ~/.ssh/known_hosts

      - name: Write Secret Key to File
        env:
          APP_STORE_CONNECT_API_KEY_CONTENT: ${{ secrets.APP_STORE_CONNECT_API_KEY_CONTENT }}
        run: |
          # ensure fastlane directory exists
          mkdir -p ./fastlane

          # create file path
          APP_STORE_CONNECT_API_KEY_PATH=./fastlane/AuthKey_XXXXXX.p8

          # write content to file (keep newline)
          echo "$APP_STORE_CONNECT_API_KEY_CONTENT" > "$APP_STORE_CONNECT_API_KEY_PATH"

          # (optional) restrict permissions
          chmod 600 "$APP_STORE_CONNECT_API_KEY_PATH"

      - name: Deploy to Firebase
        env:
          MATCH_PASSWORD: "${{ secrets.MATCH_PASSWORD }}"
        run: bundle exec fastlane deploy_to_firebase
問題3 — 設定 Private Match Repo 的 Passphrase,防止 Match 時跳 Prompt 中斷
- 同問題 1 步驟,在主要 Repo 新增 MATCH_PASSWORD 到 Secret
- 內容輸入你設定的 Fastlane Match RepoPassphrase
- 主要 Repo 的 GitHub Actions 加上 env: secret.MATCH_PASSWORD:
name: CI - Deploy
on:
  push:
    branches: [ main ]
  pull_request:
jobs:
  build:
    runs-on: ubuntu-latest
    steps:
      - name: Checkout current repo (Repo A)
        uses: actions/checkout@v4

      - name: Setup SSH for Deploy Key
        run: |
          mkdir -p ~/.ssh
          echo "${{ secrets.MATCH_REPO_DEPLOY_PRIVATE_KEY }}" > ~/.ssh/id_ed25519
          chmod 600 ~/.ssh/id_ed25519
          ssh-keyscan github.com >> ~/.ssh/known_hosts

      - name: Write Secret Key to File
        env:
          APP_STORE_CONNECT_API_KEY_CONTENT: ${{ secrets.APP_STORE_CONNECT_API_KEY_CONTENT }}
        run: |
          # ensure fastlane directory exists
          mkdir -p ./fastlane

          # create file path
          APP_STORE_CONNECT_API_KEY_PATH=./fastlane/AuthKey_XXXXXX.p8

          # write content to file (keep newline)
          echo "$APP_STORE_CONNECT_API_KEY_CONTENT" > "$APP_STORE_CONNECT_API_KEY_PATH"

          # (optional) restrict permissions
          chmod 600 "$APP_STORE_CONNECT_API_KEY_PATH"

      - name: Deploy to Firebase
        env:
          MATCH_PASSWORD: "${{ secrets.MATCH_PASSWORD }}"
        run: bundle exec fastlane deploy_to_firebase
問題4 — Self-hosted Runner 上的 Keychain 處理
跟雲端機器每次都是乾淨全新的不同,如果是用 Self-hosted Runner 我們可以在 Fastlane 指定 derived_data_path、output_directory、buildlog_path 、reinstall_app 讓每次執行的環境都是乾淨的;但是 Certificates, Profiles 是安裝到系統的 Keychain 應用中,該如何處理?
其實 Fastlane 也幫我們考慮到了,可以在 Match 之前先建立一個乾淨的 Keychain:
name: CI - Deploy
on:
  push:
    branches: [ main ]
  pull_request:
jobs:
  build:
    runs-on: ubuntu-latest
    steps:
      - name: Checkout current repo (Repo A)
        uses: actions/checkout@v4

      - name: Setup SSH for Deploy Key
        run: |
          mkdir -p ~/.ssh
          echo "${{ secrets.MATCH_REPO_DEPLOY_PRIVATE_KEY }}" > ~/.ssh/id_ed25519
          chmod 600 ~/.ssh/id_ed25519
          ssh-keyscan github.com >> ~/.ssh/known_hosts

      - name: Write Secret Key to File
        env:
          APP_STORE_CONNECT_API_KEY_CONTENT: ${{ secrets.APP_STORE_CONNECT_API_KEY_CONTENT }}
        run: |
          # ensure fastlane directory exists
          mkdir -p ./fastlane

          # create file path
          APP_STORE_CONNECT_API_KEY_PATH=./fastlane/AuthKey_XXXXXX.p8

          # write content to file (keep newline)
          echo "$APP_STORE_CONNECT_API_KEY_CONTENT" > "$APP_STORE_CONNECT_API_KEY_PATH"

          # (optional) restrict permissions
          chmod 600 "$APP_STORE_CONNECT_API_KEY_PATH"

      - name: Create fastlane keychain
        env:
          KEYCHAIN_NAME: "${{ runner.name }}"
          MATCH_PASSWORD: "${{ secrets.MATCH_PASSWORD }}"
        run: |
          bundle exec fastlane run create_keychain \
            name:"$KEYCHAIN_NAME" \
            password:"$MATCH_PASSWORD" \
            unlock:true \
            timeout:0 \
            lock_when_sleeps:false

      - name: Deploy to Firebase
        env:
          MATCH_PASSWORD: "${{ secrets.MATCH_PASSWORD }}"
          KEYCHAIN_NAME: "${{ runner.name }}"
        run: bundle exec fastlane deploy_to_firebase

      # 🔥 不管前面成功或失敗,一定會執行
      - name: Delete fastlane keychain
        if: always()
        env:
          KEYCHAIN_NAME: ${{ runner.name }}
        run: |
          bundle exec fastlane run delete_keychain \
            name:"$KEYCHAIN_NAME"
- 每個 Runner 同時只會執行一個,因此我們用 Runner Name 當成 Keychain Name,每個 Runner 都會有自己的 Keychain
- 執行完畢,不管成功或失敗都會刪除
- keychain_password 我就沒特別另外設定了,統一用 MATCH_PASSWORD
Fastlane/Fastfile 裡的 match 方法多加上 keychain parameters:
#...
    match(
      type: "adhoc",
      app_identifier: app_identifier,
      readonly: false, # 如果有需要,更新、上傳 cert / profile
      force_for_new_devices: true, # 如果為新裝置則重建 provisioning profile
      keychain_name: ENV['KEYCHAIN_NAME'], # default value: nil
      keychain_password: ENV['MATCH_PASSWORD'] # default value: nil
    )
#...
這樣 Match 在拉取憑證的時候就會改存到指定的 Keychain,而非共用的 login keychain。
結語
Fastlane 的文章範圍太大了,這邊就只記錄使用 Fastlane Match 的過程;其他關於 Fastlane 跑測試、打包發佈…等等 Lane 有機會再寫一篇新的補充;其他 Match 相關的問題,有想到什麼案例會再來補充!也歡迎留言提問!
延伸閱讀
- CI/CD 實戰指南(一):CI/CD 是什麼?如何透過 CI/CD 打造穩定高效的開發團隊?工具選擇?
- CI/CD 實戰指南(二):GitHub Actions 與 self-hosted Runner 使用與建置大全
- CI/CD 實戰指南(三):使用 GitHub Actions 實作 App 專案的 CI 與 CD 工作流程
- CI/CD 實戰指南(四):使用 Google Apps Script Web App 串接 GitHub Actions 建置免費易用的打包工具平台
敬請移步閱覽。🤞🏻
有任何問題及指教歡迎 與我聯絡 。
https://medium.com/media/8652ffa596b15d4e2a3dc94591c00522/hrefiOS Certificates, Identifiers & Profiles 是什麼及 Fastlane Match 統一管理憑證與 CI/CD 的一些筆記 was originally published in ZRealm Dev. on Medium, where people are continuing the conversation by highlighting and responding to this story.